

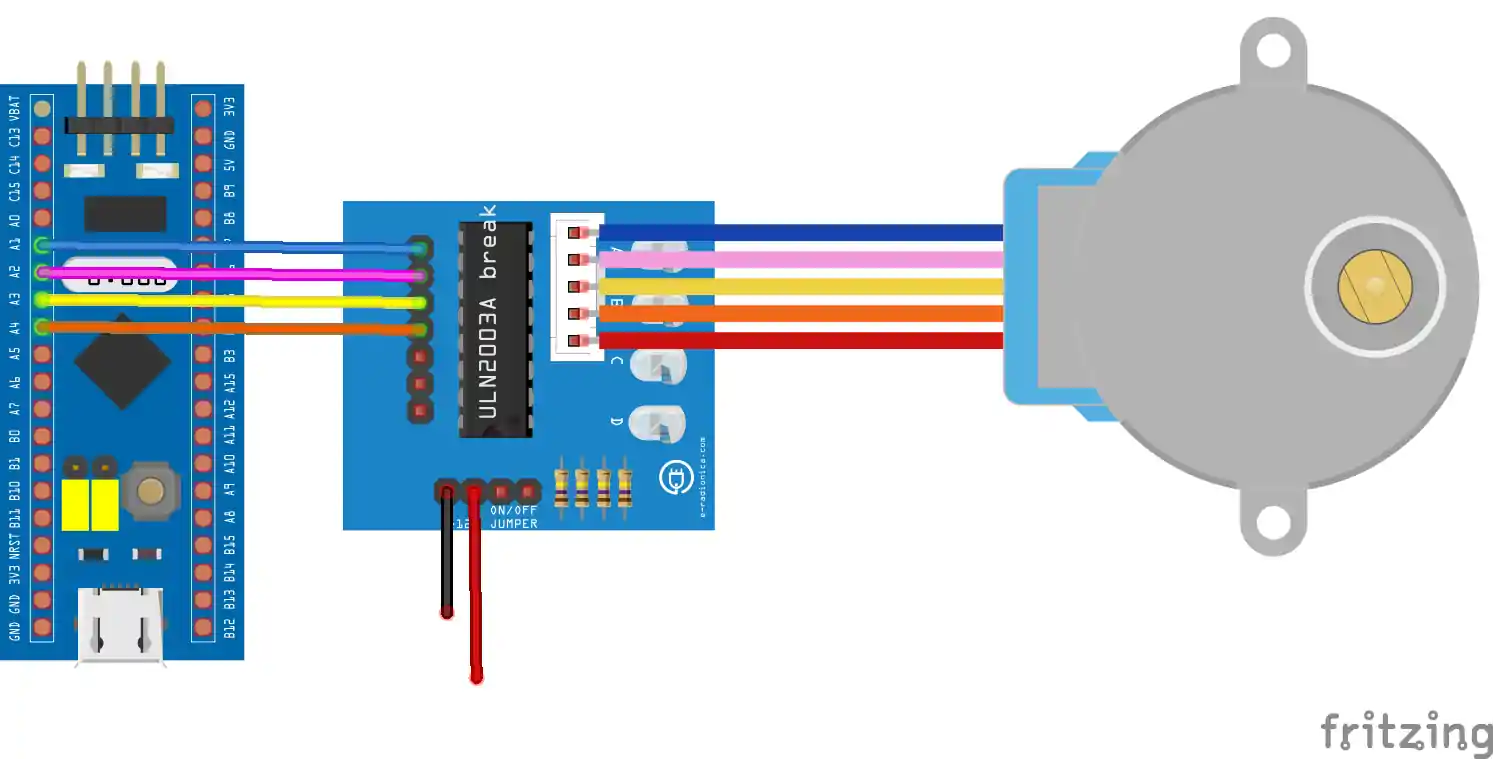
Interface Stepper motor with STM32
A stepper motor divides full rotation into number of equal steps. It finds great application in the fields of Robotics. Today, in this tutorial, we will learn how to interface stepper motor with STM32.
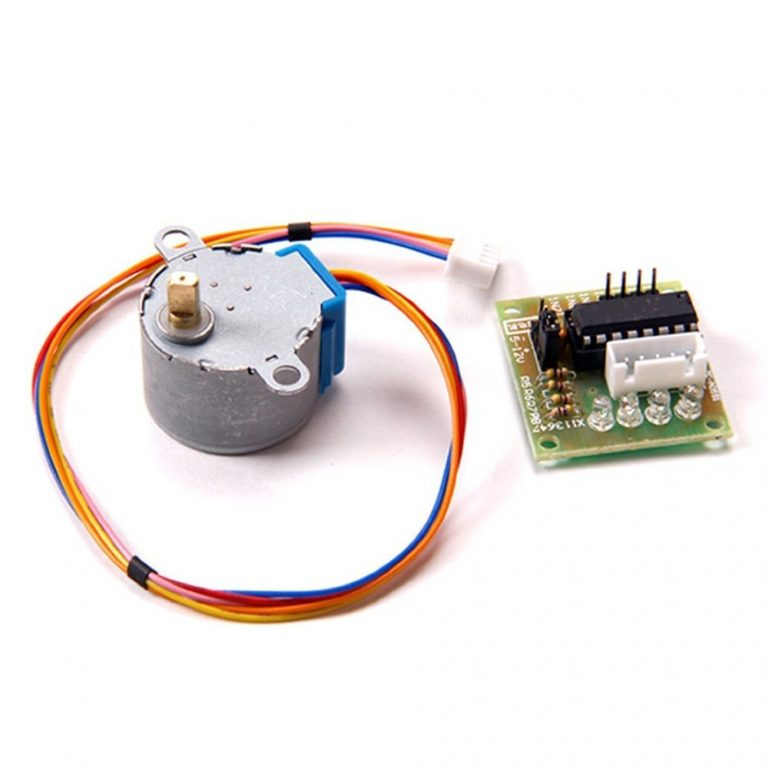
Stepper motors generally comes along with an IC ULN2003. This IC is used to drive motor because microcontroller pins are unable to provide sufficient current to drive these motors. There are three different types of stepping modes used for stepper motors:-
- Wave Drive
- Full Drive
- Half Drive
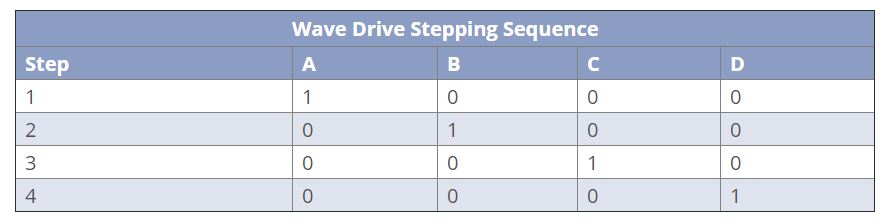
Wave Drive
In this mode only one stator electromagnet is energized at a time. It has the same number of steps as the full step drive. The motor takes 2048 STEPS to complete 1 revolution, which means 2048/4 = 512 sequences per Revolution.
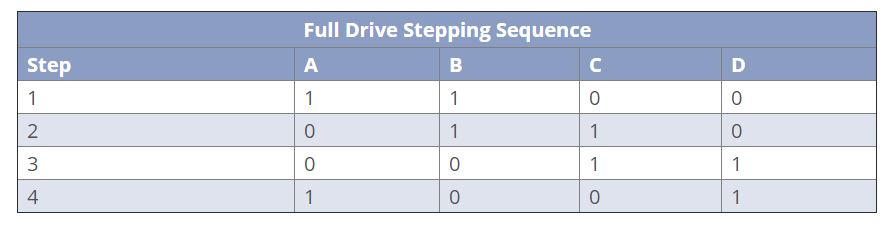
Full Drive
In this mode two stator electromagnets are energized at a time and the motor runs at full torque. Two phases are energized at the same time, and motor have more Torque than the Wave Drive. The motor takes 2048 STEPS to complete 1 revolution, which means 2048/4 = 512 sequences per Revolution.
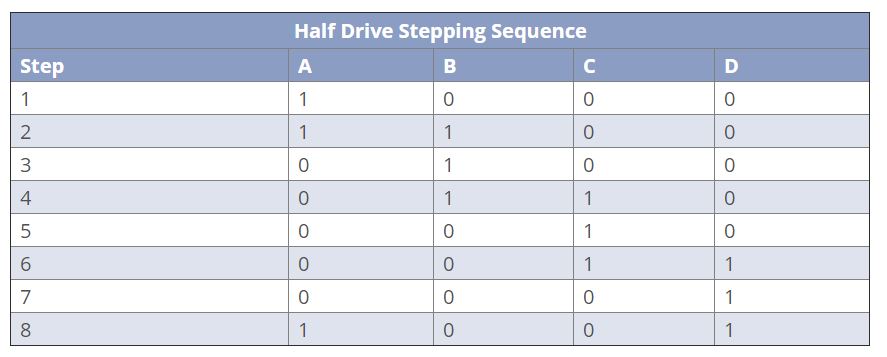
Half Drive
In this mode, one and two phases are energized alternatively. This mode is used to increase the angular resolution of the motor but the torque is reduced. The Torque remains somewhere in between the Wave Drive and Full Drive. The motor takes 4096 STEPS to complete 1 revolution, which means 2048/8 = 512 sequences per Revolution.
Some Insight into the CODE
void delay (uint16_t us)
{
  __HAL_TIM_SET_COUNTER(&htim1, 0);
  while (__HAL_TIM_GET_COUNTER(&htim1) < us);
}
First of all create the delay in microseconds. If you don’t understand this part goto https://controllerstech.com/create-1-microsecond-delay-stm32/
#define stepsperrev 4096Define the number of steps the motor takes for 1 revolution
void stepper_set_rpm (int rpm)  // Set rpm--> max 13, min 1,,,  went to 14 rev/min
{
	delay(60000000/stepsperrev/rpm);
}
The above function to set the RPM of the Motor. We have to use it instead of delay.
void stepper_half_drive (int step)
{
	switch (step){
		case 0:
			  HAL_GPIO_WritePin(GPIOA, GPIO_PIN_1, GPIO_PIN_SET);   // IN1
			  HAL_GPIO_WritePin(GPIOA, GPIO_PIN_2, GPIO_PIN_RESET);   // IN2
			  HAL_GPIO_WritePin(GPIOA, GPIO_PIN_3, GPIO_PIN_RESET);   // IN3
			  HAL_GPIO_WritePin(GPIOA, GPIO_PIN_4, GPIO_PIN_RESET);   // IN4
			  break;

		case 1:
			  HAL_GPIO_WritePin(GPIOA, GPIO_PIN_1, GPIO_PIN_SET);   // IN1
			  HAL_GPIO_WritePin(GPIOA, GPIO_PIN_2, GPIO_PIN_SET);   // IN2
			  HAL_GPIO_WritePin(GPIOA, GPIO_PIN_3, GPIO_PIN_RESET);   // IN3
			  HAL_GPIO_WritePin(GPIOA, GPIO_PIN_4, GPIO_PIN_RESET);   // IN4
			  break;

		case 2:
			  HAL_GPIO_WritePin(GPIOA, GPIO_PIN_1, GPIO_PIN_RESET);   // IN1
			  HAL_GPIO_WritePin(GPIOA, GPIO_PIN_2, GPIO_PIN_SET);   // IN2
			  HAL_GPIO_WritePin(GPIOA, GPIO_PIN_3, GPIO_PIN_RESET);   // IN3
			  HAL_GPIO_WritePin(GPIOA, GPIO_PIN_4, GPIO_PIN_RESET);   // IN4
			  break;

		case 3:
			  HAL_GPIO_WritePin(GPIOA, GPIO_PIN_1, GPIO_PIN_RESET);   // IN1
			  HAL_GPIO_WritePin(GPIOA, GPIO_PIN_2, GPIO_PIN_SET);   // IN2
			  HAL_GPIO_WritePin(GPIOA, GPIO_PIN_3, GPIO_PIN_SET);   // IN3
			  HAL_GPIO_WritePin(GPIOA, GPIO_PIN_4, GPIO_PIN_RESET);   // IN4
			  break;

		case 4:
			  HAL_GPIO_WritePin(GPIOA, GPIO_PIN_1, GPIO_PIN_RESET);   // IN1
			  HAL_GPIO_WritePin(GPIOA, GPIO_PIN_2, GPIO_PIN_RESET);   // IN2
			  HAL_GPIO_WritePin(GPIOA, GPIO_PIN_3, GPIO_PIN_SET);   // IN3
			  HAL_GPIO_WritePin(GPIOA, GPIO_PIN_4, GPIO_PIN_RESET);   // IN4
			  break;

		case 5:
			  HAL_GPIO_WritePin(GPIOA, GPIO_PIN_1, GPIO_PIN_RESET);   // IN1
			  HAL_GPIO_WritePin(GPIOA, GPIO_PIN_2, GPIO_PIN_RESET);   // IN2
			  HAL_GPIO_WritePin(GPIOA, GPIO_PIN_3, GPIO_PIN_SET);   // IN3
			  HAL_GPIO_WritePin(GPIOA, GPIO_PIN_4, GPIO_PIN_SET);   // IN4
			  break;

		case 6:
			  HAL_GPIO_WritePin(GPIOA, GPIO_PIN_1, GPIO_PIN_RESET);   // IN1
			  HAL_GPIO_WritePin(GPIOA, GPIO_PIN_2, GPIO_PIN_RESET);   // IN2
			  HAL_GPIO_WritePin(GPIOA, GPIO_PIN_3, GPIO_PIN_RESET);   // IN3
			  HAL_GPIO_WritePin(GPIOA, GPIO_PIN_4, GPIO_PIN_SET);   // IN4
			  break;

		case 7:
			  HAL_GPIO_WritePin(GPIOA, GPIO_PIN_1, GPIO_PIN_SET);   // IN1
			  HAL_GPIO_WritePin(GPIOA, GPIO_PIN_2, GPIO_PIN_RESET);   // IN2
			  HAL_GPIO_WritePin(GPIOA, GPIO_PIN_3, GPIO_PIN_RESET);   // IN3
			  HAL_GPIO_WritePin(GPIOA, GPIO_PIN_4, GPIO_PIN_SET);   // IN4
			  break;

		}
}
Above is the function for the Half Drive. The stepper takes 8 steps to complete 1 sequence in half drive.
void stepper_step_angle (float angle, int direction, int rpm)
{
	float anglepersequence = 0.703125;  // 360 = 512 sequences
	int numberofsequences = (int) (angle/anglepersequence);

	for (int seq=0; seq<numberofsequences; seq++)
	{
		if (direction == 0)  // for clockwise
		{
			for (int step=7; step>=0; step--)
			{
				stepper_half_drive(step);
				stepper_set_rpm(rpm);
			}

		}

		else if (direction == 1)  // for anti-clockwise
		{
			for (int step=0; step<8; step++)
			{
				stepper_half_drive(step);
				stepper_set_rpm(rpm);
			}
		}
	}
}
The function to move the stepper by some angle. Here we can also control the direction and RPM.
Basically, the motor takes 512 sequences to complete 1 revolution. That means 512 sequences for 360 degrees. This converts to 0.703125 degrees per sequence. Using this, we can calculate the sequences required for the particular angle.
Result


21 Comments. Leave new
The code works well if you want to move the motor for a number of sequences. How would one move steps less than a sequence? Lets say I want to move 5 steps, which is less than a full sequence, how will this be done? Or if I want to move 9 steps, which is one full sequence plus one step.
Hi,
I have copied the code as is and made the connections which I have double checked. When I run the code, my motor vibrates but doesn’t rotate.
I have tested with two different motors and driver boards but no luck.
Can anyone please help.
Resolved the issue. My wiring was not right. Swapper IN1 and IN2 and the motor started rotating.
Hi, what is that 60000000 in delay function that is used in stepper_set_rmp function?
from where that number is written?
Hi, my motor is vibrating but no rotating, do you know why ?
Did you solve ur problem?
Check your wire connection
Can you suggest me what I need to drive three stepper motors with stm32f1
well 4 pins are used to drive 1 motor. So you need to use 12 pins
Couldn’t download the stepper motor code. I guess the application/user folder is missing. The download contains only the auto generated Core and driver folders.
check the main.c file
What consideraions should we have when we work with a NEMA 17.
I couldn’t do the connection, can you help me
What’s there to do the connection? Stepper comes along a fixed connector, and you can connect it only one way.
Is it possible to reverse direction of the rotation?
yes. In thew function stepper_step_angle , second parameter is direction. I have commented the values in the code.
1
your mathematic ist wrong
Ok. Can u elaborate ?
where is your Main function?
you can download the entire code.